The Future in Your Kitchen: A Complete Guide to 3D Printed Kitchen Tools

The 3D printing revolution has transformed everything from rapid prototyping in engineering to personalized medical implants. Now, this groundbreaking technology is making its way into the heart of the home: the kitchen. The ability to design and print custom-made cookie cutters, specialized utensils, and unique organizational tools opens up a world of culinary creativity. But with this power comes a critical question: is it actually safe?
The idea of using a plastic gadget you made at home to prepare your food can be daunting. Concerns about food safety, bacteria, and chemical leaching are valid. This comprehensive guide will demystify the process, serving as your ultimate resource for safely and effectively creating 3D printed kitchen tools. We will cover everything from choosing the right materials and optimizing your printer to essential finishing techniques that ensure your creations are not only innovative but also food-safe.
The Big Question: Is 3D Printing Food-Safe?
Let’s address the primary concern head-on. A 3D print is not inherently food-safe right off the print bed. The safety of a 3D printed kitchen tool depends on three key factors:
- The Filament Material: Is the plastic itself non-toxic and approved for food contact?
- The Printing Process: Could the printer itself introduce harmful particles?
- The Physical Nature of the Print: The layer lines characteristic of FDM (Fused Deposition Modeling) printing create microscopic nooks and crannies that are perfect breeding grounds for bacteria.
The good news is that with the right knowledge and procedures, you can mitigate these risks and create tools that are safe for many kitchen applications. This guide will show you how.
Part 1: The Foundation – Choosing a Food-Safe Filament
The single most important decision you will make is your choice of filament. Not all plastics are created equal. You must use a material specifically designated as “food-grade” or “food-safe” by the manufacturer.
Top Food-Safe Filament Choices:
- PETG (Polyethylene Terephthalate Glycol): This is often the go-to choice for food-related prints. It’s the same family of plastic used in water bottles and food containers. PETG is durable, has low shrinkage, and is widely considered non-toxic. Always look for “virgin” PETG from a reputable manufacturer that explicitly states it’s food-grade.
- PLA (Polylactic Acid): While PLA is a bioplastic derived from corn starch and is generally considered non-toxic, it has a low melting point. This makes it unsuitable for anything that will come into contact with hot foods, liquids, or a dishwasher. It’s best reserved for items like cookie cutters, stamps, or stencils used with cool, dry ingredients.
- Food-Safe PLA Blends: Some manufacturers offer special PLA blends formulated for increased temperature resistance and food safety.
- PP (Polypropylene): This is a tough, flexible, and highly chemical-resistant plastic used in many commercial kitchen containers (like yogurt pots). It can be tricky to print with due to warping but is an excellent food-safe option if you can master it.
- Ceramic and Metal Filaments (Advanced): For the ultimate food-safe print, you can use special filaments that are later fired in a kiln (for ceramic) or sintered (for metal) to create a solid, non-porous object. This is an advanced process but yields truly permanent and safe kitchenware.
Filaments to AVOID for Kitchen Tools:
- ABS (Acrylonitrile Butadiene Styrene): Releases styrene fumes during printing and is not considered food-safe.
- Nylon (Unless Specifically Certified): Can absorb moisture and may contain chemicals not suitable for food contact unless certified by the manufacturer.
- Recycled Filaments: While eco-friendly, you cannot guarantee the purity or source of the plastic, making them unsuitable for food applications.
Part 2: The Machine – Preparing Your 3D Printer
Even with food-safe filament, your printer can introduce contaminants. Your goal is to create a clean pathway from the spool to the nozzle.
- Clean Your Extruder and Nozzle: If you’ve been printing with non-food-safe materials like ABS, you must thoroughly clean your extruder gear and hotend. It’s highly recommended to dedicate a specific nozzle (preferably stainless steel) solely for food-safe prints to prevent cross-contamination. Brass nozzles can contain trace amounts of lead.
- Use a Direct Drive Extruder (If Possible): While not essential, a direct drive system has a shorter filament path than a Bowden setup, which can reduce the areas where particles might accumulate.
- Check Your PTFE Tube: In Bowden setups, ensure your PTFE tube is clean and in good condition, as high temperatures can cause it to degrade over time.
Part 3: The Design and Slicing – Optimizing for Safety and Function
How you design and slice your model is crucial for minimizing bacterial growth and ensuring durability.
Design Best Practices:
- Smooth Surfaces are Key: Design models with minimal complex textures. The smoother the surface, the fewer places for bacteria to hide.
- Avoid Sharp Internal Corners: Use fillets and chamfers in your design software to round out sharp corners, making them easier to clean.
- Think About Functionality: Design for strength. A custom spatula that snaps when flipping a pancake is useless. Consider print orientation and wall thickness for maximum durability.
Slicer Settings for Food-Safe Prints:
- Increase Infill: Use a higher infill percentage (40%+) to make the part stronger and less porous.
- Increase Wall/Perimeter Count: A higher number of walls (3-5) creates a more solid barrier between the outside surface and the internal infill structure.
- Slight Over-Extrusion: Increasing the extrusion multiplier or flow rate by a few percent (e.g., 102-105%) can help fuse the layer lines together more completely, reducing gaps.
- Enable “Ironing” (Optional): This feature allows the hot nozzle to make a final pass over the top surface, smoothing it out and further sealing it.
Part 4: The Finishing Touch – Essential Post-Processing Techniques
This is the most critical step for turning a standard 3D print into a food-safe kitchen tool. You must seal the surface to eliminate the layer lines where bacteria can grow.
Method 1: Food-Safe Epoxy or Resin Coating
This is the most reliable method for creating a durable, non-porous, and washable surface.
- What to Use: You must use a two-part epoxy resin that is specifically certified as “food-safe” or “FDA compliant” after curing. Brands like ArtResin or specific products from makers like ZDSticky are popular choices.
- The Process:
- Clean your finished print with isopropyl alcohol.
- Mix the two-part resin according to the manufacturer’s instructions.
- Carefully apply a thin, even coat over the entire surface of your print using a disposable brush or silicone tool.
- Allow it to cure completely in a dust-free environment. This can take 24-72 hours.
- Result: A glossy, smooth, glass-like surface that is completely sealed and easy to wash.
Method 2: Silicone Conformal Coating
Some food-grade silicone coatings can be brushed or sprayed onto a print to create a flexible, waterproof seal. Ensure the product is certified for food contact.
What about other smoothing techniques?
- Sanding: While sanding can smooth a surface, it can also open up pores in the plastic. It should only be done as a preparation step before applying a food-safe coating.
- Vapor Smoothing (e.g., with Acetone for ABS): This is not recommended for kitchen tools as it involves harsh chemicals and is typically used with non-food-safe plastics.
Innovative Ideas for 3D Printed Kitchen Tools
Now that you know the safety protocols, what can you create?
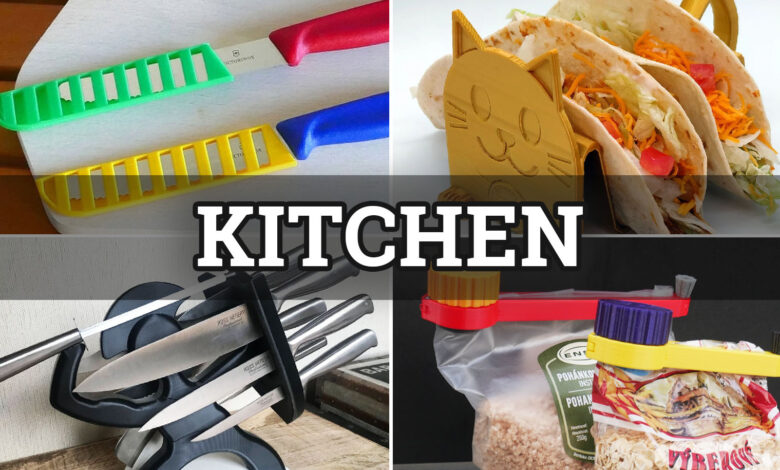
- Hyper-Specific Cookie Cutters: Print cutters in the shape of your company logo, a pet’s face, or a favorite video game character.
- Custom Spice Stencils: Create stencils to decorate the foam on a cappuccino or dust powdered sugar onto a cake in a specific pattern.
- Ergonomic Utensil Grips: Design and print custom grips to slide onto existing utensils, making them more comfortable for people with arthritis or dexterity issues.
- Specialized Pasta Tools: Design your own garganelli boards, gnocchi paddles, or custom pasta-shaping tools.
- The “Perfect” Avocado Slicer: Measure your average avocado and design a tool that perfectly pits and slices it in one go.
- Custom-Fit Drawer Organizers: Measure your kitchen drawers precisely and print organizers that fit perfectly, with custom slots for all your specific tools.
- Jig for Perfect Cake Slicing: Print a guide that ensures every slice of cake is exactly the same size.
Conclusion: A New Era of Kitchen Customization
The world of 3D printed kitchen tools is a frontier of personalization and innovation. While it requires more diligence and care than printing a simple figurine, the results can be incredibly rewarding. By prioritizing safety—choosing the right materials, preparing your equipment, designing intelligently, and, most importantly, applying a food-safe sealant—you can confidently bring this futuristic technology into your kitchen.
You are no longer limited by what’s available in a store. If you can imagine a tool that would make your life in the kitchen easier or more creative, you now have the power to design and create it. This is the ultimate expression of a maker’s mindset, applied to the art of cooking. Happy printing, and happy cooking


